Building an underwater camera housing comes down to one idea: every joint, window and cable entry has to resist water pushing inward, and the only way to know yours holds is to test it in stages before it goes anywhere near real work. Most DIY failures are not exotic. They are a twisted O-ring, a sealing face wiped with a cotton bud that left lint, or a housing labelled for shallow water that somebody took to 25 metres.
If you are putting a camera on a marine robot, an ROV frame or a drop frame for field sampling, the housing does three jobs at once. It keeps salt water out, it passes light through a flat acrylic window or dome port without ruining the image, and it survives the vibration and handling that comes with a working vehicle in a working sea.
Budget roughly a weekend for the first cut-and-seal prototype and another weekend for testing. Difficulty sits in the middle: the machining is ordinary shop work, but the sealing discipline is where projects live or die.
Table of Contents
What You Need to Build an Underwater Camera Housing
Here is the working list for a camera housing you can build, test and mount on a robot. Everything here is available from a hardware store, a plastic supplier or an electronics distributor.
- The camera. A small action camera or a compact body camera is far easier to house than a DSLR. Check that it still powers on when the case is closed and that you can reach the record control, or accept that it runs on a fixed recording schedule.
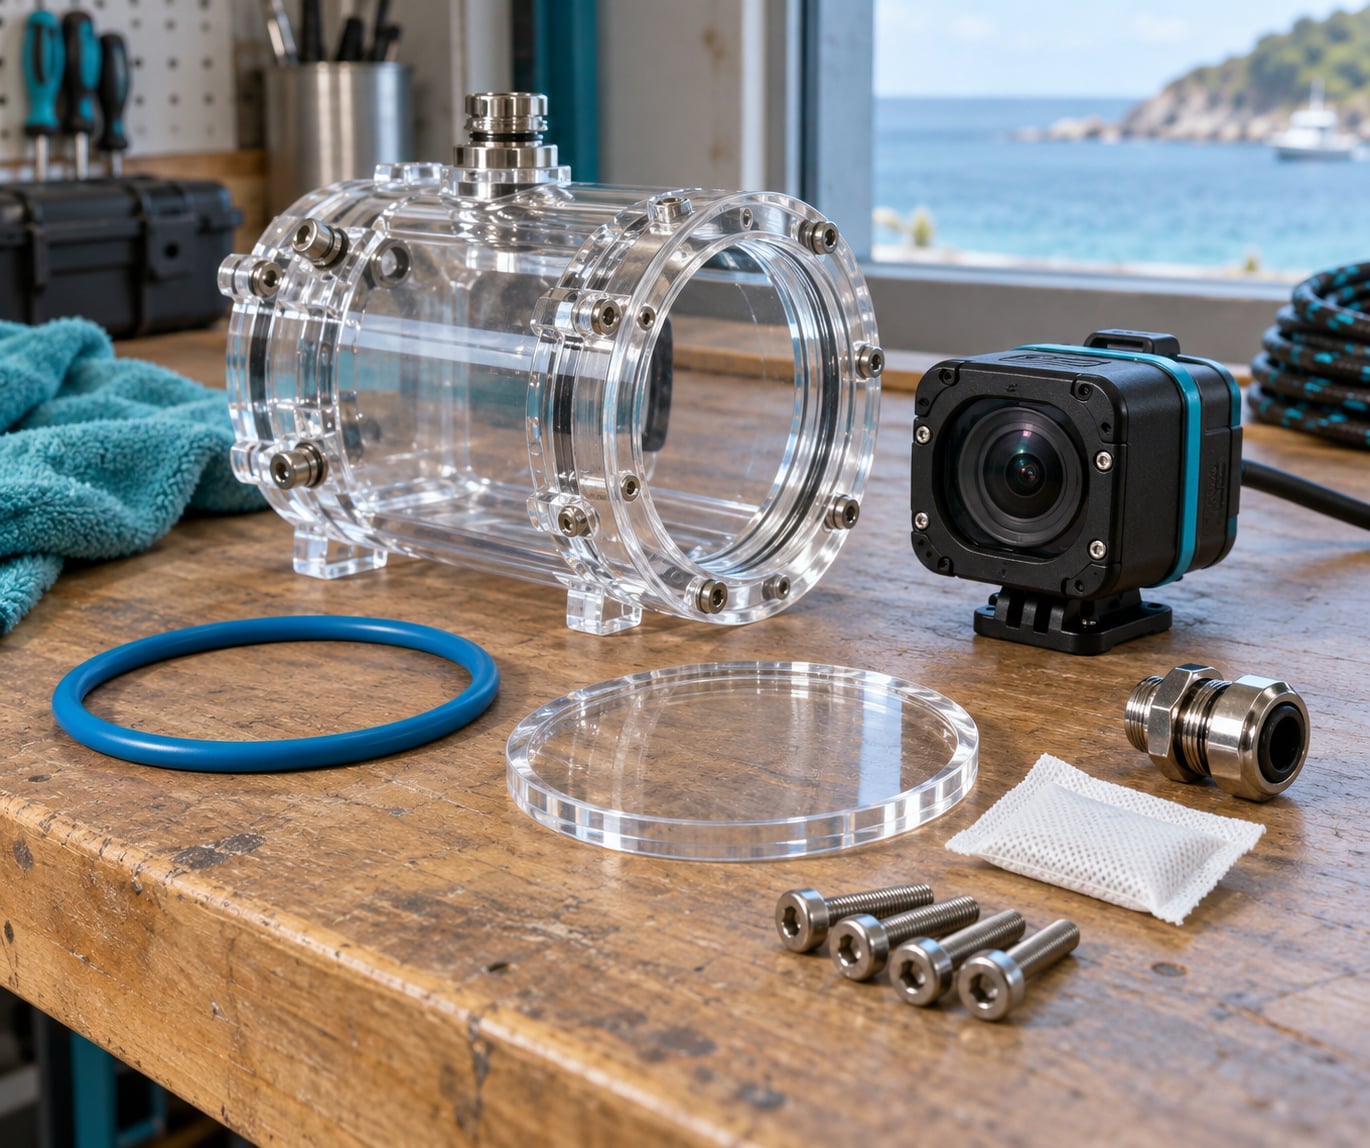
- Housing body. An acrylic tube, a polycarbonate box, a thick-walled PVC pipe section or a printed resin shell. The brief calls for corrosion resistance, so stainless fixings and no bare steel inside.
- Optical window or dome. A flat acrylic window with a machined recess, or a dome port if you need a wide field of view. Acrylic is far easier to machine than glass and will not shatter if you drop the housing.
- Seals. O-rings in the correct material for the job, plus a gasket or a machined face if you are running a face seal. Nitrile handles cold shallow water; fluorelastomer is the safer pick for anything warm or chemically exposed.
- Corrosion-resistant fasteners. Stainless steel or titanium screws, nuts and washers. Add marine-grade anti-corrosion compound on anything threaded in saltwater.
- Connectors and cable pass-throughs. A sealed bulkhead connector, a potted cable entry, or a gland sized to the cable you are running. Sealant designed for the job, not general-purpose silicone.
- Mounting hardware. A base plate with a threaded insert or a clamp band, plus rubber or neoprene isolation material between the housing and the robot frame.
- Waterproofing materials. Marine epoxy, acrylic-compatible cement for solvent bonding, PTFE tape for threads, and a thin film of silicone grease on O-rings.
- Pressure-test equipment. A vacuum pump with a valve, a bucket or tub, a depth-rated test tank if you have access to one, and a simple gauge or manometer.
- Safety gear. Gloves, eye protection, a rescue line, and a hard case to carry the housing down to the water. A failed housing at depth will destroy the camera and can injure the person holding the frame.
Condensation control is part of the kit too. A small sachet of silica gel and a strip of lens tissue cost almost nothing and save footage that fogs over in the first two minutes of a dive.
Choosing the material for the housing body
Material choice decides how the housing behaves under pressure, not just how it looks. Acrylic machines beautifully and stays clear, polycarbonate takes impacts that would shatter acrylic, PVC is cheap and easy to cut, and printed resin is flexible and fast to iterate on but has a low ceiling on depth.
| Material | Machining | Impact resistance | Bonding | Realistic DIY depth |
|---|---|---|---|---|
| Acrylic (PMMA) | Easy to drill and mill, holds a fine edge | Brittle, cracks if struck hard | Solvent cement or acrylic-safe epoxy | Shallow to about 10 m with care |
| Polycarbonate | Tougher to machine, needs sharp tooling | Very good | Epoxy or polyurethane | Shallow to mid teens of metres |
| PVC pipe | Simple cuts, cheap | Moderate | Solvent cement or epoxy | Very shallow, a few metres |
| 3D-printed resin | Fast to iterate, layer lines to finish | Low, brittle when loaded | Epoxy to a bonded insert | Pool and shallow water only |
That last column is the one people skip. Acrylic and printed resin both look strong in the hand and behave very differently once the outside of the housing is at several atmospheres.
Working out the pressure you are designing for
Water adds roughly one atmosphere of pressure for every 10 metres of descent. A housing rated for a pool is not a housing you can take to a working depth, because every seal, screw and window carries the full difference between inside and outside.
| Depth | Gauge pressure | Pressure difference on the housing |
|---|---|---|
| 5 m | about 0.5 atm | about 5 kN on every square metre |
| 10 m | about 1 atm | about 10 kN on every square metre |
| 20 m | about 2 atm | about 20 kN on every square metre |
| 30 m | about 3 atm | about 30 kN on every square metre |
| 60 m | about 6 atm | about 60 kN on every square metre |
Take the depth you actually plan to work at, then test to a fraction of it. For a homebuilt housing, most of the mistakes happen in the first metre of pressure change, not at the bottom.
Step-by-Step
Choose and Size the Housing
Match the housing to the camera before you cut anything. Measure the camera body with its battery and card fitted, then add the depth of the cradle, the thickness of the window and the clearance the O-ring groove needs. A housing that only just fits will end up with pinched wiring and a lens pressed against the window.
Decide three numbers in writing: the working depth, the viewing angle you need, and the weight and buoyancy budget on the robot. Those numbers decide the wall thickness, the window diameter and whether the housing needs ballast underneath.
Robots add loads that handheld rigs never see. Thrusters shake the frame continuously, and a housing that is fine on a pool bottom can crack at the mount after an hour of buzzing. Treat the housing as a structural part of the vehicle, not a box clipped to the end of it.
Prepare the Housing and Sealing Surfaces
Deburr every edge that a seal or a cable will touch, then clean each sealing surface with a lint-free cloth and isopropyl alcohol. A scratch becomes a leak channel, and a fingerprint on an O-ring face becomes a starting point for water.
Run a dry fit with the camera, cradle, window and O-rings all in place. It should close with hand pressure alone, no forcing and no tools. If you have to lever the last part closed, something is misaligned and it will not get better under pressure.
Chase the threads lightly and cover them with PTFE tape if the fasteners enter a wet cavity. Make sure nothing inside the housing can contact the lens or the window when the vehicle jolts.
Install the Camera and Optical Window
Mount the camera on a cradle that holds it in one position under vibration. Foam, neoprene tape or a printed bracket all work; what matters is that the body cannot shift and the lens axis stays centred behind the port.
Set the distance between the front element and the window carefully. Too close and you get a soft, fogged image with reflections off the inner face. Too far and the corners fall outside the field of view on a wide lens.
A flat acrylic window is the simpler choice and works well up to moderate fields of view, but it bends light enough that straight objects near the edges can look stretched. A dome port pushes its centre of curvature toward the subject and keeps the edges closer to correct, which is why dome ports are used for wide shots.
Seat the window on its O-ring or gasket without any sealant smeared across the optical path. Grease the O-ring lightly with silicone, and remember that a housing rated for a flat window is usually rated for that window alone. A different port changes the rating.
Seal the Housing and Route Electrical Connections
Install O-rings squarely, without twisting or rolling them into the groove, and lubricate them with silicone grease or the manufacturer’s recommended medium. Dry rubber against a dry face is a leak waiting to happen. Skip the grease and the O-ring will grip and twist as you close the housing.
Use sealant only where it belongs. Marine epoxy suits threaded and bonded joints, acrylic cement solvent-welds acrylic without a gap, and general-purpose silicone is soft and absorbs movement, which makes it a poor structural choice on a vibrating frame.
Route cables through a bulkhead connector or a potted entry. Potting compound fills the void around the cable so water cannot track along the conductor, and a short length of flexible silicone wire inside the housing takes the vibration instead of your solder joints. Add strain relief so that when someone lifts the housing by a cable, the load lands on the housing and not on the connector.
Close the housing slowly and check the last few millimetres by eye and by hand. If a cable is pushed against the seal face as the lid shuts, reroute it before you tighten anything.
Test the Finished Underwater Camera Housing
Test in stages, and only move to the next stage when the previous one passes cleanly. Shallow soaking proves very little on its own, and treating a bucket test as proof of deep capability is the most common mistake in this whole build.
- Dry function check. Power the camera inside the closed housing on the bench. Confirm it records, confirm the controls work through any access hole, and confirm nothing is pinched.
- Vacuum test. Plug the drain or test port, pull a partial vacuum with a hand pump, and watch for pressure loss over ten minutes. A steady gauge that falls faster than the pump can pull is a leak. This catches the majority of bad seals before water is involved.
- Bucket soak. Submerge in fresh water with the camera powered and recording, weighted so it stays under. Leave it for at least an hour. Check the sample inside for water and check the recording for fogging.
- Soak again in salt water. Repeat in salt water if the housing will work in the sea. Some adhesives and gaskets behave differently in salt water, and it tells you about corrosion early.
- Incremental depth soak. Increase depth in stages rather than dropping straight to the working depth. Ten minutes at each step, checking the sample and the recording between stages. Watch for any change in the image, which often means water has reached the inside of the window.
- Final soak at working depth. Hold at the planned depth for a full mission length before you trust the housing with a mission you care about.
A pressure chamber makes this much better, because it lets you test above water at the full differential without the risk of a lost vehicle. If you cannot reach one, treat the depth soak as the ceiling of what you have actually proven, and stay well inside it.
After every soak, dry the outside, open the housing in air, and look for a water line on the O-rings and the window seat. A leak that shows up wet is much harder to trace than one that leaves a visible tide mark.
Mount the Housing on the Robot
Isolate the housing from frame vibration with rubber or neoprene between the base plate and the frame. A rigid mount transmits every thruster harmonic straight into the window and the seal faces.
Plan the buoyancy deliberately. A housing that is positively buoyant will fight the vehicle’s trim; one that is heavy will drag the frame down and change how the robot handles. Add ballast where you want weight, and place it low and centred so it acts as trim rather than as a lever.
Set the housing facing the way the robot usually travels. A dome port pointed into the flow collects drag and, at speed, adds a constant force the pilot has to hold against.
Leave room to service the camera without dismantling the whole vehicle, and shield the housing from thrusters, manipulator arms and anything else moving nearby. If a tether or a recovery line comes off the housing, arrange the strain relief so the pull goes into the frame and not into the window seat.
Finally, isolate dissimilar metals. A stainless base plate bolted directly to an aluminium frame will corrode at the contact face in seawater, so use an insulating washer or a coating between them and check it at each service interval.
Common Mistakes
Almost every failure traces back to one of these, and most of them are cheap to prevent.
- Taking a shallow-rated housing deeper. Rating is a limit, not a suggestion. Decide the working depth first, size the walls and window for it, and stay inside what you tested.
- Twisted or pinched O-rings. A ring that rolls into its groove during closing will never seal. Lubricate, align by eye, and close the housing in small increments.
- Contaminated sealing faces. Lint, dust and fingerprints become leak paths. Clean with alcohol and a lint-free cloth, then keep gloved hands off the faces until the housing is closed.
- Trapped air inside. Air pockets compress with depth and push water past a seal that looked fine at the surface. Fill the housing with freshwater, then top it up with a dab of silicone grease before the last plug.
- Wrong adhesive for the joint. Solvent cement on the wrong plastic, or soft silicone where a structural bond is needed, gives you a joint that looks sealed and moves under vibration. Match the adhesive to the materials.
- Cable strain on the connector. A cable that carries the weight of the housing will pull the connector out of its seal. Add strain relief and flexible wire inside.
- Condensation. Warm humid air inside a sealed housing cools and fogs. Dry everything thoroughly before closing, add a desiccant sachet, and leave the camera powered briefly on the bench so the warm air is the air that gets sealed in.
- Unbalanced mounting. A heavy housing high on the frame makes the robot unstable. Keep weight low and centred, and check trim before the mission.
Troubleshooting by symptom
| Symptom | Likely cause | Fix |
|---|---|---|
| Water found inside after a soak | Failed O-ring seal or a pinched cable entry | Strip, clean every face, replace the O-ring, inspect the groove for damage |
| Image fogs after a minute | Condensation on the inside of the window | Dry the interior fully, add desiccant, warm the camera before sealing |
| Drips only at depth | Seal face flexing under pressure | Check wall thickness and flatness of the sealing face, add a gasket |
| Water film inside the window | Window seat or window seal compromised | Replace the window O-ring, check for scoring on the seat |
| Nothing wrong but the image is soft at the edges | Window too close to the lens | Increase lens-to-window distance, or move to a dome port |
| Controls stop working | Finger hole sealed over or plunger lost pressure | Re-drill access, use a plunged button with a spring |
| Salt bloom around fixings after a soak | Dissimilar metals in contact | Insulate with a washer or coating, change to stainless or titanium |
Frequently Asked Questions
How deep should an underwater camera housing be?
Treat a homebuilt housing as a shallow-water device and size it for the shallowest depth you actually need, which for pool, pond and snorkelling work is under 3 metres. Testing deeper than about 10 metres with a DIY acrylic or printed housing asks for trouble you cannot reliably check for afterwards. If the work needs real depth, buy a housing rated for it.
Is acrylic suitable for an underwater camera housing?
Yes, and it is the usual DIY choice because it machines cleanly, stays clear and solvent-welds to itself. Use thick-walled acrylic, support the window with a proper O-ring seat rather than glue alone, and avoid dropping it, because acrylic cracks rather than bending. For a frame that gets knocked around, polycarbonate takes more abuse.
How do I prevent condensation inside the housing?
Condensation forms when warm humid air inside the sealed housing meets the cool window. Dry the camera and the interior thoroughly, run the camera briefly so the air you seal in is already warm, add a sachet of desiccant silica gel, and keep a strip of lens tissue in the housing so you can wipe the window during a surface check.
Can I test an underwater camera housing without a pressure chamber?
Yes, and you should test before you ever take it to depth. A partial vacuum test with a hand pump catches most bad seals in minutes, then an hour-long soak in a weighted bucket catches the rest. What you cannot do is prove deep capability this way, so soak in stages and stay well inside the depth you have actually tested.
How do I repair a leaking underwater camera housing?
Dry it, open it in air and find where the water line sat. That usually points at the O-ring seat, the cable entry or the window. Replace the O-ring with a new one of the right material, clean every sealing face with alcohol, inspect the groove for cuts or flattening, and re-test with a vacuum test before the housing goes near water again.
Conclusion
A working underwater camera housing is mostly good decisions made early: pick the shallowest depth that suits the job, choose a body material you can actually seal, give the window a proper O-ring seat, and test the whole thing in stages rather than trusting a bucket soak. On a robot, add planned buoyancy, vibration isolation and cable strain relief before the first mission, not after it.
Start by confirming three things on paper: the working depth, the camera’s dimensions including battery and card, and the sealing design you intend to use. Get those right and the machining is just an afternoon.